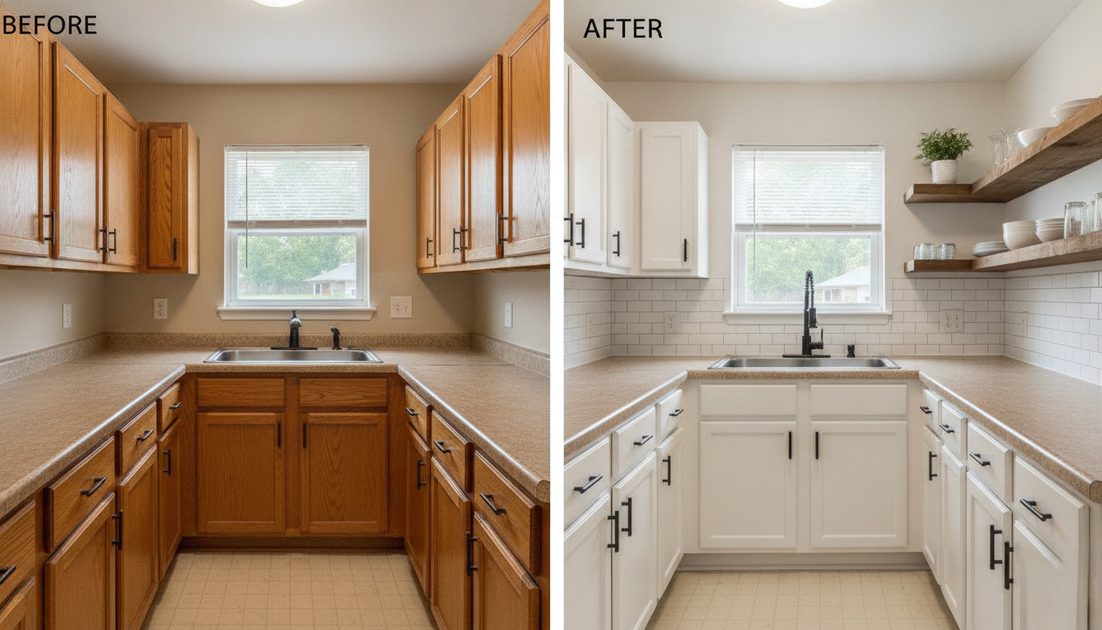
I need to tell you something upfront: I hated our kitchen for four years before I touched it.
Not a mild dislike. Not a "someday we'll update it" shrug. A full, deep, avoid-making-eye-contact-with-the-cabinets kind of hate. The cabinets were honey oak — that particular orange-toned wood that screams early 2000s builder grade. The countertops were beige laminate with a decorative ogee edge that collected crumbs like it was getting paid by the crumb. The backsplash didn't exist. Unless you count the four-inch laminate lip that matched the countertops, which I absolutely do not.
A full kitchen renovation in Nashville would have run us $25,000 minimum. We didn't have $25,000. We had a four-year-old, a mortgage, and Derek's trumpet repair fund that I was not allowed to touch.
So I did what any former designer with more taste than budget would do: I planned a budget kitchen makeover that we could do ourselves over the course of two weekends and a few weeknights.
Total cost: $1,218. Total tears: approximately four. Here's exactly where every dollar went.
The Before: What We Were Working With
The kitchen is a galley layout — cabinets on both sides, a window over the sink, about 120 square feet total. The good news: the layout worked. The bad news: literally everything else.
The honey oak cabinets were in decent structural shape but the finish had yellowed with age. The hardware was dated brass in that specific 2003 shape that's not vintage-charming, just dated. The walls were a flat beige that somehow made the room feel both smaller and dirtier than it was.
I took measurements, made a list, and set a hard budget of $1,200. If we couldn't do it within that number, we wouldn't do it at all.
Cabinet Paint: The Biggest Impact for the Smallest Cost
Painting the cabinets was the single most transformative thing in this entire DIY kitchen update, and it cost less than $200.
I used a high-bond primer designed for laminate and previously finished wood — two coats, sanded lightly between each. Then two coats of a urethane-enriched enamel paint in a soft warm white. No sprayer. I used a high-density foam roller and an angled brush for the details.
The process took an entire weekend. Removing cabinet doors and drawer fronts, labeling every single one with painter's tape so I knew where they went back, cleaning off four years of cooking grease, sanding, priming, painting, waiting, painting again. Derek handled the sanding while I handled the painting. Mia "helped" by organizing the cabinet hardware into piles and then mixing all the piles together.
The most important thing I learned: let the paint cure. I am not a patient person. I wanted to rehang the doors the next morning and call it done. But enamel paint needs days — ideally a full week — to fully harden. If you rush it, the paint will stick and peel at the contact points. I waited five days. It nearly killed me. It was worth it.
Cabinet paint and supplies: $187

Hardware: The Jewelry of the Kitchen
The old hardware was brass and not in a cool vintage way. I replaced all 28 pulls and knobs with matte black bar pulls and simple round knobs from an online hardware supplier. This is the easiest trick in a small kitchen refresh — swapping hardware changes the entire look of cabinetry without touching a paintbrush.
I kept the same hole spacing as the original hardware so I didn't have to drill new holes or fill old ones. Measure before you buy. I've made that mistake on a dresser once and I'm still annoyed about it.
Hardware: $94
Peel-and-Stick Backsplash: The Controversial Choice
I know. Peel-and-stick backsplash sounds like a rental apartment hack, not something a former interior designer would put in her own kitchen. I was skeptical too. But actual tile — with the mortar and the grout and the wet saw I don't own — would have blown the budget and the timeline.
I found a peel-and-stick option that looked like matte white subway tile with realistic grout lines. It took Derek and me about four hours to install. The trick is patience and a utility knife with fresh blades. The seams are not invisible. If you look closely, you can tell it's not real tile. But you know what? Nobody looks closely. Not a single guest has noticed.
One year later, it's held up to cooking splatters, cleaning spray, and Mia pressing her sticky hands against it. No peeling. No lifting. I'm as surprised as you are.
Peel-and-stick backsplash: $143
Open Shelving: The Risk That Paid Off
I removed two upper cabinet doors on one side of the kitchen and converted that section to open shelving. This was the scariest decision in the entire kitchen refresh on a budget — what if it looked messy? What if we regretted losing the hidden storage?
I painted the interior of the cabinet the same warm white as the exterior, then styled the shelves with our everyday dishes, a few glass canisters for dry goods, and one small plant that I have somehow kept alive for eight months. The open shelving makes the galley kitchen feel twice as wide, and it forces us to keep that section tidy instead of shoving things behind a closed door.
I didn't buy anything new for this. I used the dishes we already owned. That's the whole point.
Open shelving conversion: $0
The Full Budget Breakdown
Here's where every dollar of this kitchen renovation cost went:
Item | Cost |
|---|---|
Cabinet paint, primer, and supplies (rollers, brushes, sandpaper, tack cloths) | $187 |
New cabinet hardware (28 pieces) | $94 |
Peel-and-stick backsplash panels | $143 |
New faucet (replaced the leaky original) | $89 |
Under-cabinet LED light strips | $42 |
New light fixture over sink | $68 |
Wall paint (two gallons, warm white) | $76 |
Decorative items (rug, two tea towels, one plant) | $59 |
Paintable outlet covers and switch plates | $21 |
Total | $1,218 |
We went $18 over budget. I'm calling it a win.
What We Didn't Do (And Why)
We didn't replace the countertops. Laminate isn't my dream surface, but the beige actually looked fine once the orange cabinets were gone. We didn't replace the flooring. We didn't move any plumbing or electrical. We didn't knock down any walls.
The lesson of a budget kitchen makeover isn't doing everything. It's doing the things that make the biggest visual and functional difference for the least money. Paint transforms. Hardware modernizes. Lighting changes how you feel in a room. Everything else can wait.
One Year Later: What's Held Up and What Hasn't
The cabinet paint has held up beautifully except for one spot near the trash can where something dripped and I scrubbed too hard. Touch-up paint fixed it in five minutes. The peel-and-stick backsplash hasn't budged. The open shelving still looks good, though I have to dust the dishes more often than I'd like.
The kitchen is not perfect. It's not a magazine kitchen. But it no longer makes me angry when I walk into it. For $1,200 and two weekends of work, that's a transformation I'll take.
A home is never finished. Especially not the kitchen.
No feedback yet — submit the first.